The following just give s direct basic installation of MySQL on the above mentioned servers. The Full video is available at the Gallery section .
There will be no explanation for this blog just the needed installation steps.
MySQL on Ubuntu
sudo apt update
sudo apt install mysql-server
sudo mysql_secure_installation
To install it, update the package index on your server with apt:
sudo apt update
Then install the default package:
sudo apt install mysql-server
This will install MySQL, but will not prompt you to set a password or make any other configuration changes.
Because this leaves your installation of MySQL insecure, we will address this next.
sudo mysql_secure_installation
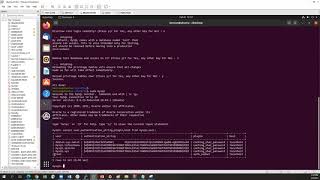
sudo mysql
SELECT user,authentication_string,plugin,host FROM mysql.user;
Output
+——————+——————————————-+———————–+———–+
| user | authentication_string | plugin | host |
+——————+——————————————-+———————–+———–+
| root | | auth_socket | localhost |
| mysql.session | *THISISNOTAVALIDPASSWORDTHATCANBEUSEDHERE | mysql_native_password | localhost |
| mysql.sys | *THISISNOTAVALIDPASSWORDTHATCANBEUSEDHERE | mysql_native_password | localhost |
| debian-sys-maint | *CC744277A401A7D25BE1CA89AFF17BF607F876FF | mysql_native_password | localhost |
+——————+——————————————-+———————–+———–+
FLUSH PRIVILEGES;
SELECT user,authentication_string,plugin,host FROM mysql.user;
Output
+——————+——————————————-+———————–+———–+
| user | authentication_string | plugin | host |
+——————+——————————————-+———————–+———–+
| root | *3636DACC8616D997782ADD0839F92C1571D6D78F | mysql_native_password | localhost |
| mysql.session | *THISISNOTAVALIDPASSWORDTHATCANBEUSEDHERE | mysql_native_password | localhost |
| mysql.sys | *THISISNOTAVALIDPASSWORDTHATCANBEUSEDHERE | mysql_native_password | localhost |
| debian-sys-maint | *CC744277A401A7D25BE1CA89AFF17BF607F876FF | mysql_native_password | localhost |
+——————+——————————————-+———————–+———–+
sudo mysql
mysql -u root -p
CREATE USER ‘sammy’@’localhost’ IDENTIFIED BY ‘password’;
GRANT ALL PRIVILEGES ON . TO ‘sammy’@’localhost’ WITH GRANT OPTION;
systemctl status mysql.service
MySQL on Debian
sudo apt update
Then, install the gnupg package:
sudo apt install gnupg
wget https://dev.mysql.com/get/mysql-apt-config_0.8.13-1_all.deb
sudo dpkg -i mysql-apt-config*
sudo apt update
sudo apt install mysql-server
sudo systemctl status mysql
mysql_secure_installation
mysqladmin -u root -p version
MySQL on CentOS
In a web browser, visit:
https://dev.mysql.com/downloads/repo/yum/
wget https://dev.mysql.com/get/mysql57-community-release-el7-9.noarch.rpm
Once the rpm file is saved, we will verify the integrity of the download by running md5sum and comparing it with the corresponding MD5 value listed on the site:
md5sum mysql57-community-release-el7-9.noarch.rpm
sudo rpm -ivh mysql57-community-release-el7-9.noarch.rpm
sudo yum install mysql-server
sudo systemctl start mysqld
sudo systemctl status mysqld
During the installation process, a temporary password is generated for the MySQL root user. Locate it in the mysqld.log with this command:
sudo grep ‘temporary password’ /var/log/mysqld.log
sudo mysql_secure_installation
mysqladmin -u root -p version
YOU CAN FOLLOW THE FULL STEPS IN THE VIDEO ATTACHED WITH ALSO HAS THE WORKBENCH CONNECTION PART AS WELL.